 BE VOICE
Integrations for agents
Connect your API to an agent
An integration lets your AI agent call your API during a call. You set it up in the console in two parts: a connection (where your system is and how to sign in), then tools on the agent (what it can look up or record, and when).
This page uses an example: Harbour Plumbing's jobs system at https://api.example.com, and a tool that lets the Receptionist look up a job by its number. What your API should send and accept is in Integrations: agents calling your API.
How to add a connection
- Click Settings (top right), then Integrations.
- In Connections, click + Add connection.
- Fill in Name, Address (base URL), Auth header and Auth value (see below).
- Click Add connection.
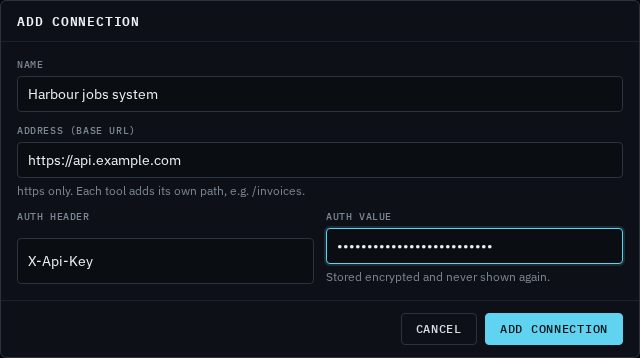
- Name
- What you'll see in tool and campaign lists, such as "Harbour jobs system".
- Address (base URL)
- Your API's base address,
https://only, on a public address. Each tool adds its own path to it, sohttps://api.example.complus/jobs/{job_number}callshttps://api.example.com/jobs/HJ-1042. - Auth header
- The header your API reads its key from:
Authorization(the default) or a name such asX-Api-Key. - Auth value
- The header's value, for example
Bearer …or the key itself. It's stored encrypted and never shown again. Leave it empty if your API needs no sign-in.
The connection now shows in the list with its address and the name of its auth header.
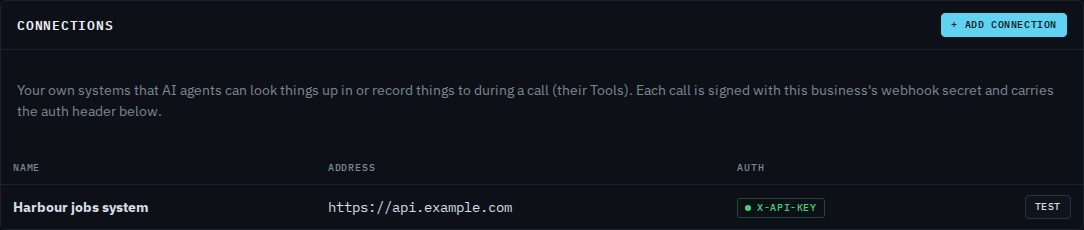
To change a connection, click it. Type a New auth value to replace the key (leave it empty to keep the stored one), or tick Remove the stored auth value. Delete connection is refused while an agent's tool or a campaign still uses it.
How to add a tool to an agent
- Open AI agents and click the agent, for example Receptionist.
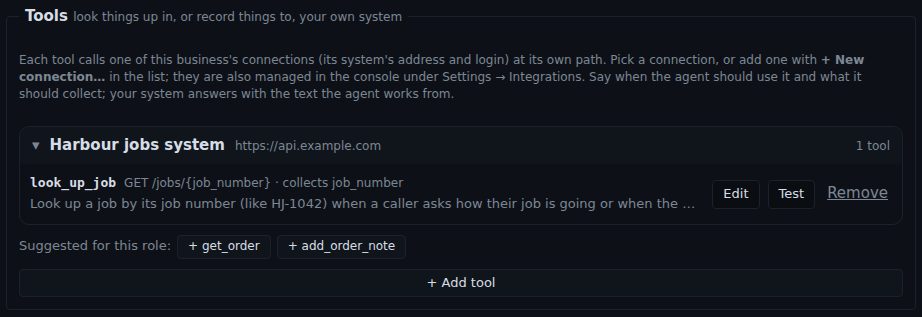
- Open the Tools tab and click + Add tool. Some roles offer ready-made tools under Suggested for this role: click one to start from it.
- Fill in the tool (see The tool's settings).
- Press Test to try it against your system (see Test a tool).
- Click Save at the top of the agent. The agent uses the tool from its next call.
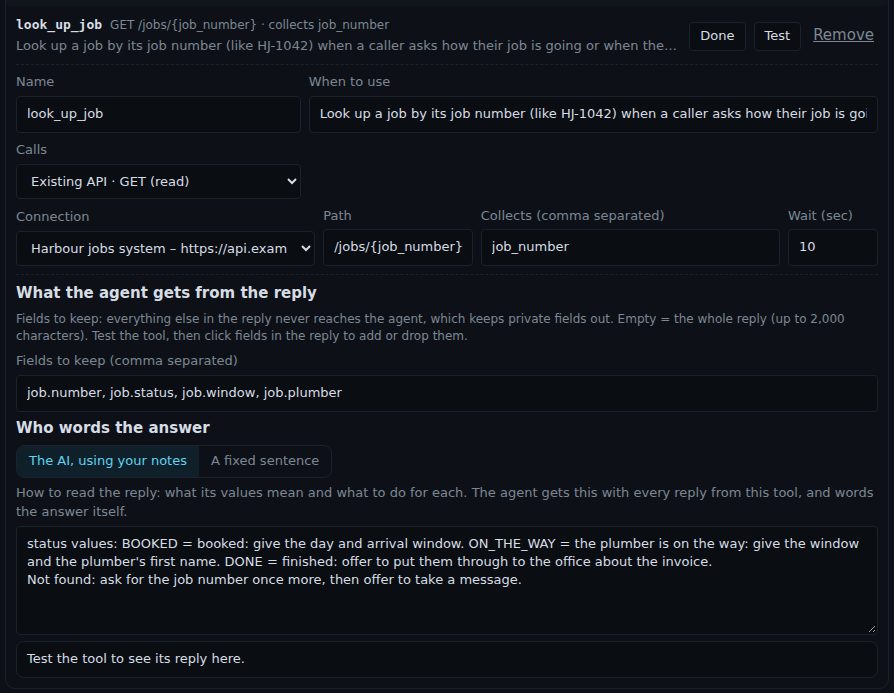
The tool's settings
- Name
- Lower-case letters, digits and
_, such aslook_up_job. It must be unique on the agent and can't be one of the agent's built-in actions (liketransferortake_message). Your API receives it in theX-BE-Voice-Toolheader. - When to use
- Required. One or two sentences that tell the agent what the tool is for and when to use it, with any formats ("job numbers look like HJ-1042", "date as YYYY-MM-DD"). This is what the agent goes by, so write it like an instruction.
- Calls
- How the tool reaches your system: Existing API · GET (read), POST (create), PUT (replace), PATCH (update) or DELETE to call your API as it is, or Your system · BE Voice request (POST) for an endpoint built for BE Voice's own format.
- Connection
- Which of your systems the tool calls.
- Path
- Added to the connection's address. For an existing API it can hold placeholders:
/jobs/{job_number}. Each placeholder is added to Collects for you. - Collects (comma separated)
- The values the agent must have before it calls, such as
job_number. The agent asks the caller for them, or uses what it already knows (for example details a campaign passed in). They go in the path, the query string (GET,DELETE) or the body. Leave it empty for a tool that needs nothing. - Wait (sec)
- How long to wait for your system: 3 to 20 seconds, 10 by default. After that the lookup counts as failed.
- Body
- For
POST,PUTandPATCHonly: a JSON template where{name}becomes what the agent collected, such as{"text": "{note}", "source": "phone"}. Leave it empty to send the collected values as one JSON object.
What the agent gets from the reply
- Fields to keep
- The parts of your reply the agent sees, as paths:
job.status,items.0.sku, oritems[].namefor that field of every item. Everything else never reaches the agent, which keeps private fields out. Empty means the whole reply, up to 2,000 characters. After a test, you can click fields in the reply to add or drop them. - Who words the answer: The AI, using your notes
- Write how to read the reply: what each value means and what to do for each. The agent gets these notes with every reply from this tool (including "nothing found" and refusals) and words the answer itself. For example: "BOOKED = booked: give the day and arrival window. Not found: ask for the job number once more, then offer to take a message."
- Who words the answer: A fixed sentence
- A sentence filled from the reply, such as
Job {job.number} is {job.status}.It's said the same way every time, with values as they come (a code likeBOOKEDstaysBOOKED), so use it only when the wording must be exact. A field that isn't in the reply comes out as "(unknown)".
An agent can have up to 10 tools. They're grouped by connection on the Tools tab, each on one line with its method, path and what it collects; click Edit to open one.
Test a tool
- On the tool's line, click Test. A box appears for each value it collects.
- Type real values from your system, such as a job number that exists.
- Click Send test.
The test sends the tool as it is set up on screen, saved or not, through the connection with its sign-in header and signature. It shows:
- The result line
- OK, Not found (your API answered
404) or Refused (400,409,422with a sentence), with the status code and how long your system took, such as "OK · 200 · 180 ms". - The agent is told
- Exactly what the agent would get on a call: your answer or the fixed sentence, the fields you kept, and your notes. Under the reply box at the bottom of the tool, the same preview updates as you change the fields or notes.
- The reply as it came
- Your reply with every value clickable. Click a field to add it to Fields to keep, or click it again to drop it. Lists show their first item.
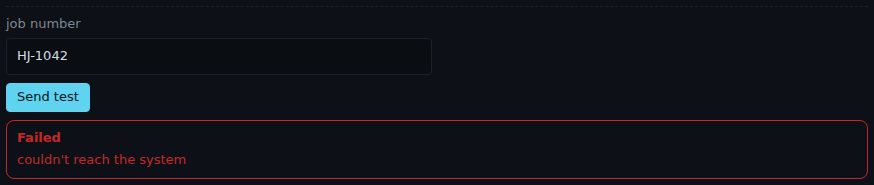
- Failed
- Why it didn't work: the address couldn't be reached, the wait ran out, the reply wasn't JSON or was over 64 KB, or your API answered with an error status. On a call, the agent would say it couldn't check and offer a message or a call back.
A test request has no X-BE-Voice-Call-Id header, and its Idempotency-Key starts with test- and is new each time. It always waits up to 10 seconds.
How the agent decides to use a tool
On every call the agent knows each tool's name, its When to use line and what it collects. When the conversation matches a tool's purpose, it:
- Gets the values the tool collects: from what it already knows about the call, or by asking the caller.
- Says a short line such as "One moment, let me check", so the caller isn't left in silence.
- Sends the request and reads what it's told: the reply's kept fields and your notes, or the fixed sentence.
- Answers the caller, asks again if nothing was found or the value was refused, or, if the lookup failed, offers a message or a call back.
An agent makes at most 8 tool requests on one call. Each request is tried once.